MCP Access
Connect Sentra MCP to ChatGPT, Claude, Cursor, Codex, and other AI clients.
Sentra exposes an MCP (Model Context Protocol) server so AI clients and agents can read your meetings, memory, and entities directly. The server uses Streamable HTTP and supports OAuth sign-in or a personal API key, depending on your client.
Connection methods
There are two ways to connect:
| Method | Best for | What you need |
|---|---|---|
| One-click connect (OAuth) | ChatGPT, Claude, Claude Code, Codex, VS Code (via mcp-remote) | Sign in to Sentra and click Allow when prompted |
| Manual API key | Cursor (.cursor/mcp.json) and other clients that accept a server URL plus a Bearer token | A personal API key from Settings → API Access |
Setup
Claude
Individual users
Prerequisite for org-managed Claude: A Claude admin must complete Org-wide Claude Admin one-time setup before individual users can connect.
Choose Customize in the Claude menu (web app or desktop app). You must see the Sentra MCP connector on the list that your Claude admin enabled:


Press Connect on the right side:

This opens Sentra's authentication and authorization page. Press Allow to grant access.
If Sentra is not on your connector list, add a custom web connector with:
| Field | Value |
|---|---|
| Name | Sentra |
| URL | https://api.sentra.app/mcp/ |
Try a prompt like: "What was my last meeting about?"
Org-wide Claude Admin one-time setup
Note: You must be an admin in Claude to perform this org-wide step.
Step 1: Add Sentra MCP to the Organization in Claude
Visit Claude admin connectors and start adding a custom web connector:
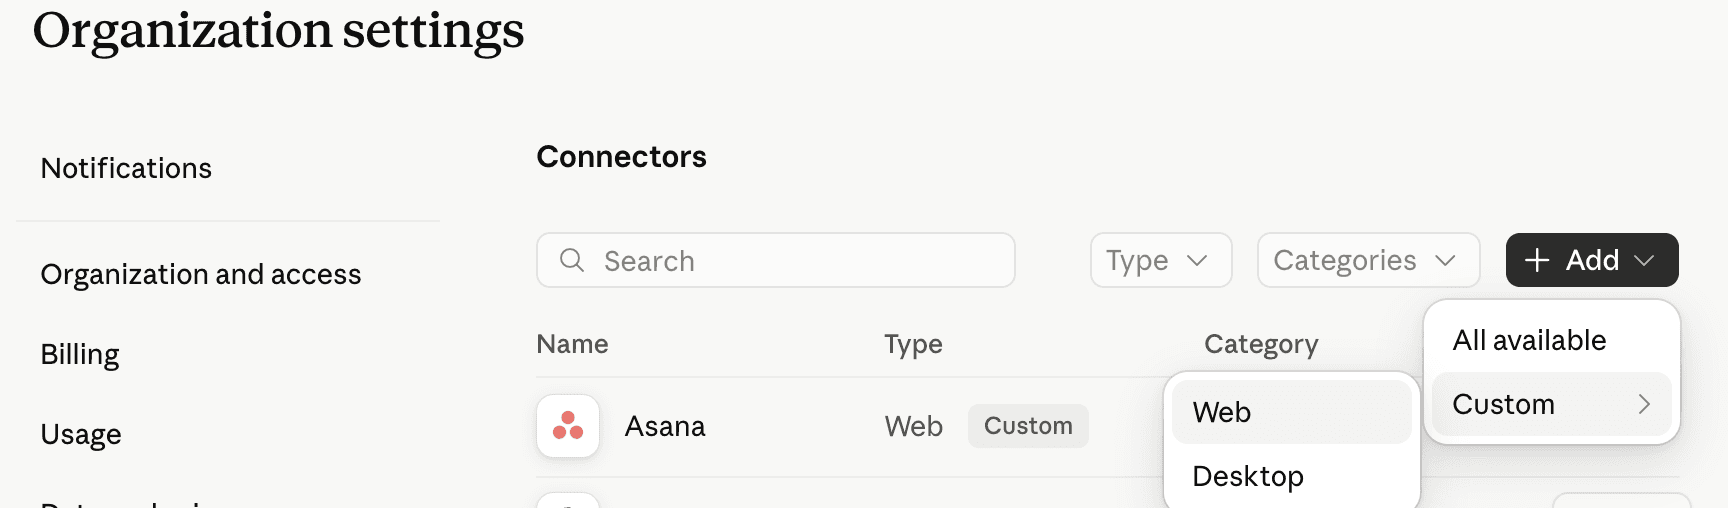
Fill only two fields and press Add:
| Field | Value |
|---|---|
| Name | Sentra |
| URL | https://api.sentra.app/mcp/ |

Step 2: Connect to Sentra as the Claude Admin
As the Claude admin, go to your personal connector settings at Customize connectors and Connect to Sentra MCP:
This opens Sentra's authentication and authorization page. Press Allow to grant access.
Step 3: Allow Sentra tools to be called without prompts
As Claude admin, return to the organizational connectors page, find Sentra, and press the three dots on the right to See details:

Scroll to Default restriction for unconfigured tools and set it to Always allow (the checkmark in a circle). Otherwise Claude keeps prompting users to allow Sentra MCP tools in every session.

Notes:
- Note A: The Default restriction for unconfigured tools section is only visible after the Claude admin connects their Sentra MCP in Step 2.
- Note B: For custom-created roles, edit them separately in Admin settings → People → Roles.
Claude Code
Add Sentra as a remote HTTP MCP server:
claude mcp add --transport http sentra https://api.sentra.app/mcp/After you open a Claude Code session, run /mcp once to complete the Sentra sign-in and authorization flow.
ChatGPT
- In ChatGPT, go to Settings → Connectors → Add custom connector, and enter
https://api.sentra.app/mcp/. - ChatGPT redirects you to a Sentra sign-in page. Log in if you are not already.
- On the Sentra consent screen, click Allow.
- You return to ChatGPT and Sentra tools are ready to use.
Codex
The setup steps are the same whether you use the Codex IDE extension or the CLI, because they share one config file.
Configuration via CLI:
codex mcp add sentra --url https://api.sentra.app/mcp/Codex prompts you to sign in to Sentra and connect.
If this is your first MCP server in Codex, enable the rmcp feature in ~/.codex/config.toml:
[features]
experimental_use_rmcp_client = true
Configuration via ~/.codex/config.toml:
[features]
experimental_use_rmcp_client = true

[mcp_servers.sentra]
url = "https://api.sentra.app/mcp/"
Then run codex mcp login sentra to complete authentication.
Cursor
Cursor uses a static config file and a Sentra API key in the Authorization header.
Step 1 — Generate your API key
- Go to Settings → API Access.
- Click Generate Key and copy the key. It starts with
sk_sentra_.
Step 2 — Add the Sentra MCP to Cursor
Add this to your .cursor/mcp.json:
{
  "mcpServers": {
    "sentra": {
      "url": "https://api.sentra.app/mcp/",
      "headers": {
        "Authorization": "Bearer sk_sentra_YOUR_KEY_HERE"
      }
    }
  }
}
Step 3 — Confirm it is working
Restart (or reload) Cursor and ask it to list its Sentra tools, or try a prompt like: "Search my Sentra meetings for last week's standup." If Cursor responds with Sentra data, you are connected.
Visual Studio Code
For clients that do not support remote MCP natively, use mcp-remote to bridge stdio to Sentra's remote server. Sentra completes OAuth when you first connect.
{
  "mcpServers": {
    "sentra": {
      "command": "npx",
      "args": ["-y", "mcp-remote", "https://api.sentra.app/mcp/"]
    }
  }
}
Quick setup in VS Code:
- Press
Ctrl/Cmd + Pand search for MCP: Add Server. - Select Command (stdio).
- Enter:
npx -y mcp-remote https://api.sentra.app/mcp/ - Name the server Sentra.
- Run MCP: List Servers, select Sentra, and choose Start Server.
- Complete the Sentra sign-in flow when prompted.
Windsurf
- Press
Ctrl/Cmd + ,to open Windsurf settings. - Scroll to Cascade → MCP servers.
- Select Add Server → Add custom server.
- Add:
{
  "mcpServers": {
    "sentra": {
      "command": "npx",
      "args": ["-y", "mcp-remote", "https://api.sentra.app/mcp/"]
    }
  }
}- Start the server and complete Sentra OAuth when prompted.
Zed
- Press
Cmd + ,to open Zed settings. - Add:
{
  "context_servers": {
    "sentra": {
      "source": "custom",
      "command": "npx",
      "args": ["-y", "mcp-remote", "https://api.sentra.app/mcp/"],
      "env": {}
    }
  }
}- Complete the Sentra sign-in flow when prompted.
Other clients
Any MCP client that accepts a remote server URL and custom headers can connect with a personal API key.
Step 1 — Generate your API key
- Go to Settings → API Access.
- Click Generate Key and copy the key. It starts with
sk_sentra_.
Step 2 — Configure your client
You need two values:
| Setting | Value |
|---|---|
| Server URL | https://api.sentra.app/mcp/ |
| Authorization header | Bearer sk_sentra_YOUR_KEY_HERE |
Add the server URL and Authorization header in your client's MCP or connector settings. Refer to your client's documentation for where to enter remote MCP servers.
If your client only supports stdio MCP servers, use mcp-remote:
- Command:
npx - Arguments:
-y mcp-remote https://api.sentra.app/mcp/
Step 3 — Confirm it is working
Restart (or reload) your client and verify Sentra tools appear, or ask it to search your Sentra meetings.